In my previous blog post I discussed the dashboard feature in general and focused on the “Folder Dashboard” which is shown when you select a document or folder in the navigation panel. In this blog post I will focus on the “Remote Desktop Dashboard”.
The RDP dashboard is shown whenever you click on an inactive remote desktop connection in the navigation panel. When you click on an active remote desktop connection, the connection tab is shown by default but you can switch back to the dashboard tab at any time.
Configuration
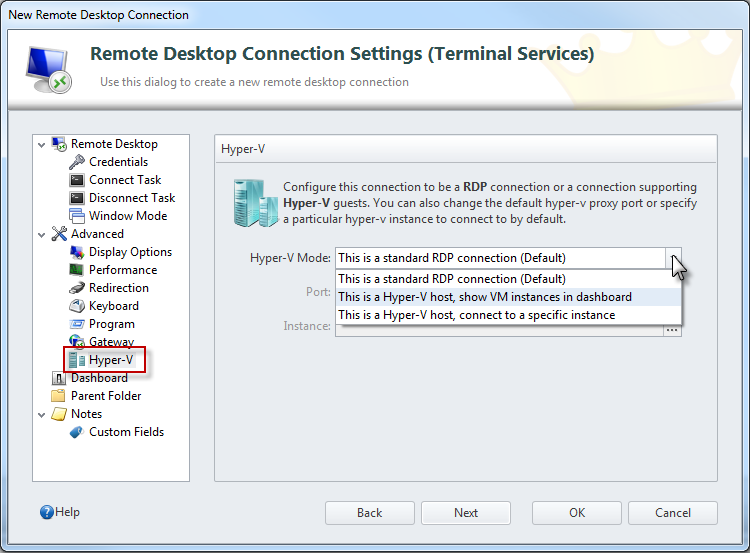
There are two dashboard components available for remote desktop connections: the “Hyper-V Instances” pane and the “Terminal Services Sessions” pane. To control what dashboard components are shown, use the “Hyper-V” configuration page in the remote desktop connection properties:
Hyper-V Modes:
-
This is a standard RDP connection (Default) When you connection is configured using this option, you will only see the “Terminal Services Sessions” pane allowing you to control and interact to connected and disconnected sessions on that server (very similar to what Terminal Services Manager MMC offers).
-
This is a Hyper-V host, show VM instances in dashboard Selecting this option makes sense if the connection you’ve created points to a Hyper-V host. This will show both the “Hyper-V Instances” pane allowing you to control all hosted instances from the dashboard and the “Terminal Services Sessions” pane.
-
This is a Hyper-V host, connect to a specific instance If you select this option, you can browse for a specific instance (using the browse button from the Instance textbox) or just enter the VM GUID. This will show only the “Hyper-V Instances” pane filtered to show only the one instance you’ve selected. This way you have quick and easy access to control the configured instance from the dashboard.
Behavior
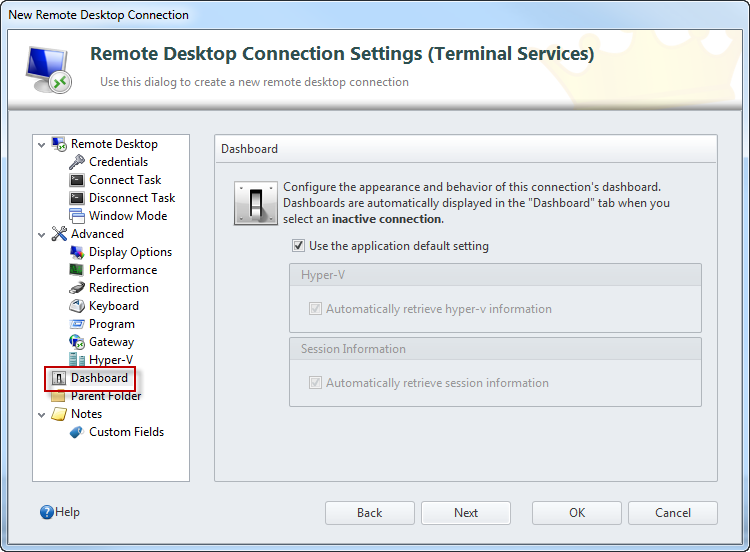
You can also control the default behavior when a dashboard is shown using the “Dashboard” configuration page in the remote desktop connection properties:
As the check box “Use the application default setting” suggests, you can configure application wide default setting using the “Options” dialog. The idea here is that you can refer to the application settings in case you work with two different computers – one having direct network access to the remote machine, the other is a maybe mobile computer and doesn’t have direct network access most of the time. In this case you set up to automatically retrieve instances and sessions on your directly connected machine and disable automatic retrieval on your mobile computer. So one configured connection can behave differently on different computers without changing the connection properties individually.
Un-checking the “Use the application default setting” check box also allows you to create exceptions easily. For example, most machines are reachable in your network but some are not. For those not reachable, it just doesn’t make sense to even try to retrieve all the information. In this case you can create exceptions by un-checking the check box and configure the behavior explicitly for the connection.
Remote Desktop Connection Dashboard
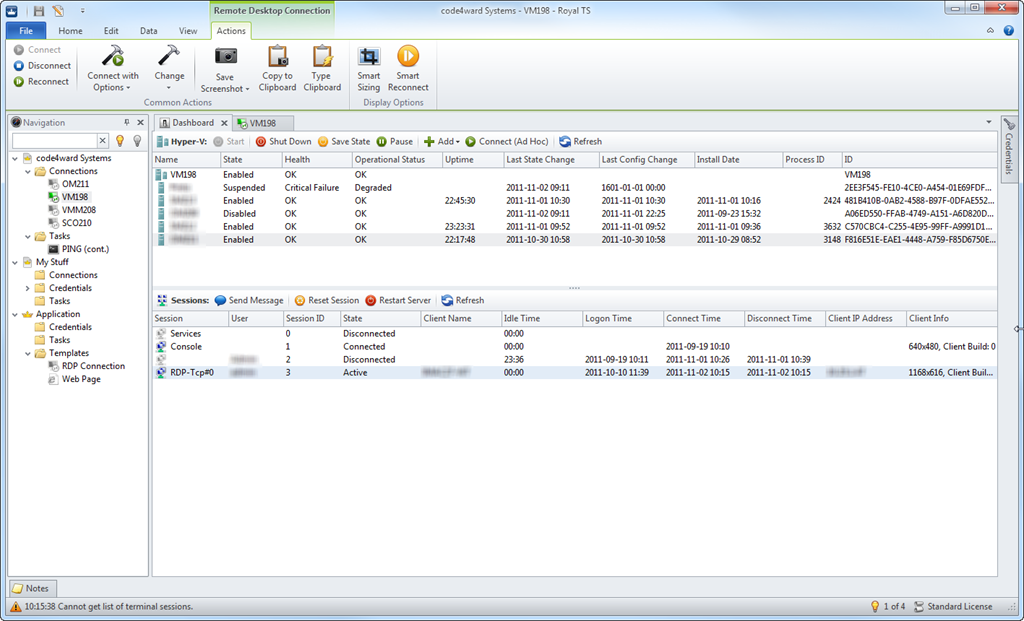
The above screenshot shows a dashboard of a remote desktop connection configured as a Hyper-V host. Also note that there’s currently an active connection to the machine but I manually switched back to the dashboard to see all the Hyper-V instances and the sessions (including the one I’ve opened from within Royal TS).
Hyper-V Instances Pane
Requirements
To actually see the instances, the “Hyper-V Instances” pane needs to be able to access the remote machine (the Hyper-V host) using WMI across the network (WMI by default needs ports like RPC, NetBIOS, SMB). Also the user account running Royal TS (beware of UAC!) or the credentials of the remote desktop connection needs to have local administrative rights on the remote machine.
Toolbar Commands
The instance list offers a lot of details about the configured Hyper-V guests. You can select an instance and use the toolbar on top of the pane to control instances. There are also some shortcut commands helping you to work with those instances in Royal TS.
Start: Sends the start command to the Hyper-V host for the selected instance.
Shut Down: Sends the shut down command to the Hyper-V host for the selected instance.
Save State: Saves the state of the selected Hyper-V instance.
Pause: Causes the selected Hyper-V instance to be paused.
Add Remote Desktop: Creates a new Remote Desktop connection within Royal TS based on the selected instance. Since there’s no way to find the real host name of an instance, the host name is “guessed” based on the instance name. So verify and change the name once the connection was created.
Add Hyper-V Instance: Creates a new Remote Desktop connection within Royal TS based on the selected instance, configured to connect to the selected instance.
Connect (Ad Hoc): Creates an Ad Hoc connection to the console of the selected instance.
Refresh: Refresh the list.
Terminal Services Sessions Pane
Requirements
To get sessions listed in the pane, you need to be able to reach your remote machine using RPC, NetBIOS and SMB. The user running Royal TS (again, beware of UAC!) also needs to have local administrative rights on the remote machine. Royal TS can also try to impersonate as the user configured in the connection to retrieve the session information but depending on your environment this may not work.
Toolbar Commands
The session list shows many details about the connected or disconnected sessions. You can select one or more sessions and control/interact with them using the toolbar commands of the sessions pane.
Send Message: Allows you to send a message text to the selected sessions. A dialog box with your message appears in the user session you’ve selected.
Reset Session: Allows you to log off a remote session.
Restart Server: This command can be used to quickly restart a server right from the dashboard without the need to log on.
Refresh: Refresh the list.
Conclusion
The remote desktop connection dashboard offers a great set of tools and shortcuts in your daily operational business. Hopefully your network infrastructure, your security policy and your environment allows you to utilize these tools. I know from personal experience with big enterprise environments that it’s not always possible to have direct network access to remote servers but larger environments mostly provide alternatives (like deploying your tools like Royal TS to a dedicated management workstation/terminal server with appropriate network access or VPN infrastructure).
cheers, Stefan


